
MINIX - Martin
Staff member
Sometime when people get an NEO U9-H and have a serial number such as 0123456789abcdef.
In this situation, please download the following tool to update the serial number.
https://files.theminixforum.com/shared/tools/Update_Serial_Number_for_U9-H.zip
There are video and text instructions inside the downloaded file.
The following are the instructions:
1. Extract the downloaded file to a folder in your Windows-based PC (Windows 7 or above).
2. Install the updating tool by double-clicking USB_Burning_Tool_v2.1.2.exe, allow the installation of the driver.
Run this tool after installation.
3. Proceed to the folder that installs the updating tool, and copy usid.ini to the license folder. (If the license folder does not exist, create it).
4. Attach the power adapter to the NEO U9-H, and connect the U9-H to the Windows-based PC with the micro USB cable that comes with the box.
5. Press the 'Recovery' button in the hole (at the bottom of the NEO U9-H) with a paper clip, and press the power button at the same time for 3-4 seconds, until the USB burning tool recognizes the NEO U9-H.
5. Go to ‘File’ > ‘Import image’, and load the usid.img from the folder.
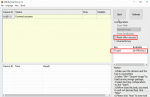
6. Please check the Reset after success and usid options, see it in the attached picture——Need-to-check options.png
7. Click Start to start updating the serial number.
8. Unplug the Micro USB cable between the PC and U9-H, click "Stop", exit the too and unplug the U9-H power adapter.
9. Then re-plug in the power adapter and press power button to start the NEO U9-H.
In this situation, please download the following tool to update the serial number.
https://files.theminixforum.com/shared/tools/Update_Serial_Number_for_U9-H.zip
There are video and text instructions inside the downloaded file.
The following are the instructions:
1. Extract the downloaded file to a folder in your Windows-based PC (Windows 7 or above).
2. Install the updating tool by double-clicking USB_Burning_Tool_v2.1.2.exe, allow the installation of the driver.
Run this tool after installation.
3. Proceed to the folder that installs the updating tool, and copy usid.ini to the license folder. (If the license folder does not exist, create it).
4. Attach the power adapter to the NEO U9-H, and connect the U9-H to the Windows-based PC with the micro USB cable that comes with the box.
5. Press the 'Recovery' button in the hole (at the bottom of the NEO U9-H) with a paper clip, and press the power button at the same time for 3-4 seconds, until the USB burning tool recognizes the NEO U9-H.
5. Go to ‘File’ > ‘Import image’, and load the usid.img from the folder.
6. Please check the Reset after success and usid options, see it in the attached picture——Need-to-check options.png
7. Click Start to start updating the serial number.
8. Unplug the Micro USB cable between the PC and U9-H, click "Stop", exit the too and unplug the U9-H power adapter.
9. Then re-plug in the power adapter and press power button to start the NEO U9-H.
")

