Enable MASKROM mode to flash U22-XJ firmware.

MINIX - Martin

Staff member
If your U22-XJ is somewhat bricked, and failed to manually re-install the firmware, you may try enabling MASKROM mode to flash the firmware.

Below are the instructions:

  1. Remove the 4 rubber feet at the bottom of the device.
  2. Remove the 4 screws with a proper screwdriver, and open the box.
  3. Remove the antenna. (See below picture)
    Open the box.jpg
  4. Install and run the Amlogic’s USB Burning Tool on Windows based PC.
  5. Connect the NEO U22-XJ to this PC via the USB-C to USB-A cable, then plug in the power adapter.
    (USB-A is attached to PC, and USB-C is attached to NEO U22-XJ)
  6. Short circuit gold-plated pads in the red rectangle with a pincer, press the POWER button (not the RECOVERY button).
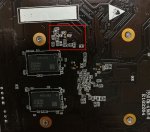
    Short circuit .jpg
  7. The device will enter MASKROM mode. (LED light is GREEN, not BLUE).
    At the same time, you’ll see the USB Burning Tool shows ‘Connect success’.
    USB Burning Tool.png
  8. On the USB Burning Tool, click ‘File’ > ‘Import image’, then choose the U22-XJ firmware file (an .img file).
  9. Then click ‘Start’ on the top-right panel of the USB Burning Tool to start flashing the firmware.
    Please note, there’s no need to change the ‘Configuration’ listed on the right panel.
  10. When flashing is completed, just un-plug the USB cable and the power adapter.
  11. Try to start the device, see if it un-bricks your NEO U22-XJ.
 
If your U22-XJ is somewhat bricked, and failed to manually re-install the firmware, you may try enabling MASKROM mode to flash the firmware.

Below are the instructions:

  1. Remove the 4 rubbery feet at the bottom of the device.
  2. Remove the 4 screws with a proper screwdriver, and open the box.
  3. Remove the antenna. (See below picture)
    View attachment 3083
  4. Install and run the Amlogic’s USB Burning Tool on Windows based PC.
  5. Connect the NEO U22-XJ to this PC via the USB-C to USB-A cable, then plug in the power adapter.
    (USB-A is attached to PC, and USB-C is attached to NEO U22-XJ)
  6. Short circuit the 2 brazen points in the red rectangle with a pincer, press the POWER button (not the RECOVERY button).
    View attachment 3084
  7. The device will enter MASKROM mode. (LED light is GREEN, not BLUE).
    At the same time, you’ll see the USB Burning Tool shows ‘Connect success’.
    View attachment 3085
  8. On the USB Burning Tool, click ‘File’ > ‘Import image’, then choose the U22-XJ firmware file (an .img file).
  9. Then click ‘Start’ on the top-right panel of the USB Burning Tool to start flashing the firmware.
    Please note, there’s no need to change the ‘Configuration’ listed on the right panel.
  10. When flashing is completed, just un-plug the USB cable and the power adapter.
  11. Try to start the device, see if it un-bricks your NEO U22-XJ.
Thank you Minix-Martin!

I do not need to use this instruction now, but very good to have if something unforeseen happens in the future.
May I ask you to specify a little more precisely which soldered points are to be short-circuited? For example. with a red arrow or further circled?
(I'm sorry, but I do not really understand which ones inside the red square).
The only two gold plated pads you can see inside the red rectangle!
Short circuit the 2 brazen points in the red rectangle
@MINIX – Martin has used the word brazen to mean made of brass. Gold plated pads would be a better terminology!
 
Back
Top