
I have had an inordinate amount of help and advice from certain members on this forum pertaining to all things Minix and computer speak, which has increased my technical knowledge exponentially.
And in particular, three members who have taken the time and patience through PMs to walk me through, step by step things like TWRP, transferring my launcher settings from U9h to U22 and understanding Smart Dns and many other computer abbreviations etc etc. I will not embarrass them publicly by naming them, but they know who they are. And a big thank you from me.
And so, I thought I would try and give some help to Mac users.
Firstly let me say that I am no expert and then again, not the absolute dummy I thought I was prior to this.")
Being a MAC user, it always frustrated me when people talked about USB burning tools and Firmware flashing. I live out in the country and my nearest Western friend with a windows machine lives some 15 kms away. So, when I had my U9H flashed to FW008, I had to call out my local whizz kid. Sure, it only cost a tenner and I was grateful because usb burning tools, reflash etc did not instill me with confidence at my level of expertise. And I certainly did not want to mess it up.
But, I thought it was time to give it a go and further my knowledge. So, searching the internet and loads of reading and re-reading gave me the heads up and confidence and I managed to do it successfully.
And, if I can do this at my level and age, it shouldn't be too hard for most people.
Below is how I managed to install-windows-mac-with-boot-camp. Having done that I installed USB burning tool and then reflashed my U9h, which was becoming rather laggy.
This is the link I chose and ignored using virtual machines?usb sticks etc and just used my Mac hard drive.
https://machow2.com/install-windows-mac-with-boot-camp. What I particularly liked with this instruction was the assurance that it would not damage my Mac and could always be uninstalled and the simple step by step instructions.
If this link does not open , just copy and paste into your search engine. The second and third links below are alternatives, but I preferred the link above.
I did not use a USB nor a windows virtual machine , like parallel windows etc. I will not be using that much. I just downloaded straight on to my mac because I have ample space on my hard drive
https://appleinsider.com/articles/1...dows-10-up-and-running-on-mac-using-boot-camp
https://www.macworld.co.uk/how-to/install-windows-mac-3497251/
STEPs:
3. Follow the instructions on the first link below and download the Windows from the link above. I chose 64 bit and windows home version. But the link will tell you what machines and OS can use this system.
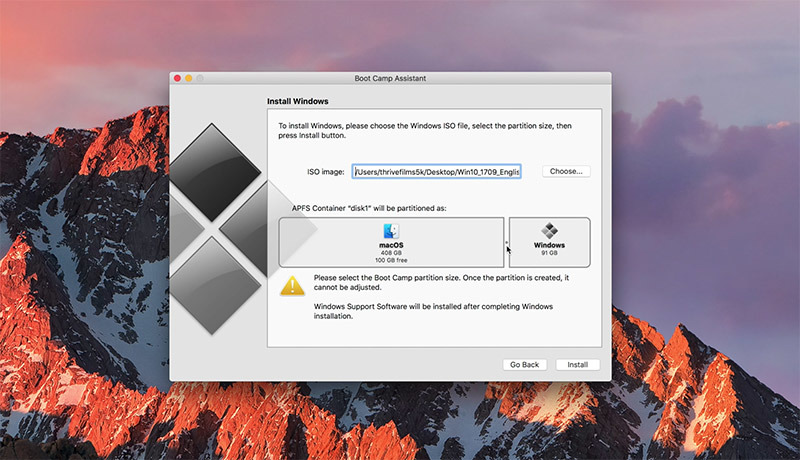
4. Having downloaded the link, open boot camp on your Mac, place your mouse cursor as shown by the arrow on the image below and slide it to the left. The windows portion will increase in GB size. I personally chose 80GB because I have no need for games etc.
5. Select the Windows ISO file from your wherever you have saved the file by clicking on “choose” .
6. Having done that, click “install”
Follow the instructions on the link to install the Windows software regarding licences etc, which you do not need. Click on “I do not have a licence” All perfectly legal. Now follow the instructions and wait.
Now, it will take some time to run through the various stages of installing, rebooting and setting up windows. One piece of advice......do not get frustrated and think that the installation is stuck.
I think overall it took me about an hour of patiently waiting. Maybe , slightly longer. I know when it started to take ages, I googled "what to do if windows stuck in installation" and the sound advice was .....be patient and wait and do not unplug your computer. If after 2 or 3 hours,....then.... etc etc.
Once it is all done, you can go ahead and download the USB burning tool and firmware for your device from the Minix forum.
Finally, yes you will have to set up your apps etc all again from playstore or wherever you obtained them. But playstore make it simple....open play store, sign in and go to the three horizontal bars, click on that and click on “my apps and games”and go to “Library and just install the previous apps you had including your launcher. If you didnt get your launcher from there, it is adviseable to download it before the next step.
To get back your original launcher settings....go to Google drive and look for the launcher backup you saved. Open it and will ask if you wish to overwrite …..and just click yes or whatever it asks to overwrite. All the apps you have installed from playstore will appear.
Those apps/apks that appear on your launcher “greyed out” means you will have to reinstall them....e.g BBC I player etc. Just go to your search engine and download from whichever store you wish, install them and they will turn from grey to a normal colour.
Finally, when you have done all that, go into your settings>Home>launchers and set your desired launcher that you have backed up and reinstalled.
Most of you may already know this and I have no wish to teach you to suck eggs. But maybe someone is going through the steep learning curve that I went through and just need some encouragement. If this helps just one person, then mission accomplished.
NB: To get into windows once you have shut your mac down is , press the "options" key on your keyboard whilst you boot up the computer. Once it is booted, you can release the options key. There are other ways top do it, but I find that easier for me. Then just click on the windows icon on your screen. It does offer a box below to enter your wi-fi. Just ignore it and it will set itself up when windows loads.
Final point when running windows with your keyboard. you may find that the "@" doesnt work. Just make sure that the language you chose at windows set up matches the keyboard language in your windows. To find that, just type "keyboard" in the bottom left corner search bar and navigate from there to confirm.
The only advice I can give, is to read the instructions, read them again until you are totally comfortable with what you are about to do. And Good luck!
If this is on the wrong section of the Forum, I am sure someone will move it to the appropriate place for me
And in particular, three members who have taken the time and patience through PMs to walk me through, step by step things like TWRP, transferring my launcher settings from U9h to U22 and understanding Smart Dns and many other computer abbreviations etc etc. I will not embarrass them publicly by naming them, but they know who they are. And a big thank you from me.
And so, I thought I would try and give some help to Mac users.
Firstly let me say that I am no expert and then again, not the absolute dummy I thought I was prior to this.
Being a MAC user, it always frustrated me when people talked about USB burning tools and Firmware flashing. I live out in the country and my nearest Western friend with a windows machine lives some 15 kms away. So, when I had my U9H flashed to FW008, I had to call out my local whizz kid. Sure, it only cost a tenner and I was grateful because usb burning tools, reflash etc did not instill me with confidence at my level of expertise. And I certainly did not want to mess it up.
But, I thought it was time to give it a go and further my knowledge. So, searching the internet and loads of reading and re-reading gave me the heads up and confidence and I managed to do it successfully.
And, if I can do this at my level and age, it shouldn't be too hard for most people.
Below is how I managed to install-windows-mac-with-boot-camp. Having done that I installed USB burning tool and then reflashed my U9h, which was becoming rather laggy.
This is the link I chose and ignored using virtual machines?usb sticks etc and just used my Mac hard drive.
https://machow2.com/install-windows-mac-with-boot-camp. What I particularly liked with this instruction was the assurance that it would not damage my Mac and could always be uninstalled and the simple step by step instructions.
If this link does not open , just copy and paste into your search engine. The second and third links below are alternatives, but I preferred the link above.
I did not use a USB nor a windows virtual machine , like parallel windows etc. I will not be using that much. I just downloaded straight on to my mac because I have ample space on my hard drive
https://appleinsider.com/articles/1...dows-10-up-and-running-on-mac-using-boot-camp
https://www.macworld.co.uk/how-to/install-windows-mac-3497251/
STEPs:
- Ensure you back up your launcher settings. I use Nova and backed it up to my drive.
- Remove any peripherals from your Mac....printer....external hard drive etc
3. Follow the instructions on the first link below and download the Windows from the link above. I chose 64 bit and windows home version. But the link will tell you what machines and OS can use this system.
4. Having downloaded the link, open boot camp on your Mac, place your mouse cursor as shown by the arrow on the image below and slide it to the left. The windows portion will increase in GB size. I personally chose 80GB because I have no need for games etc.
5. Select the Windows ISO file from your wherever you have saved the file by clicking on “choose” .
6. Having done that, click “install”
Follow the instructions on the link to install the Windows software regarding licences etc, which you do not need. Click on “I do not have a licence” All perfectly legal. Now follow the instructions and wait.
Now, it will take some time to run through the various stages of installing, rebooting and setting up windows. One piece of advice......do not get frustrated and think that the installation is stuck.
I think overall it took me about an hour of patiently waiting. Maybe , slightly longer. I know when it started to take ages, I googled "what to do if windows stuck in installation" and the sound advice was .....be patient and wait and do not unplug your computer. If after 2 or 3 hours,....then.... etc etc.
Once it is all done, you can go ahead and download the USB burning tool and firmware for your device from the Minix forum.
Finally, yes you will have to set up your apps etc all again from playstore or wherever you obtained them. But playstore make it simple....open play store, sign in and go to the three horizontal bars, click on that and click on “my apps and games”and go to “Library and just install the previous apps you had including your launcher. If you didnt get your launcher from there, it is adviseable to download it before the next step.
To get back your original launcher settings....go to Google drive and look for the launcher backup you saved. Open it and will ask if you wish to overwrite …..and just click yes or whatever it asks to overwrite. All the apps you have installed from playstore will appear.
Those apps/apks that appear on your launcher “greyed out” means you will have to reinstall them....e.g BBC I player etc. Just go to your search engine and download from whichever store you wish, install them and they will turn from grey to a normal colour.
Finally, when you have done all that, go into your settings>Home>launchers and set your desired launcher that you have backed up and reinstalled.
Most of you may already know this and I have no wish to teach you to suck eggs. But maybe someone is going through the steep learning curve that I went through and just need some encouragement. If this helps just one person, then mission accomplished.
NB: To get into windows once you have shut your mac down is , press the "options" key on your keyboard whilst you boot up the computer. Once it is booted, you can release the options key. There are other ways top do it, but I find that easier for me. Then just click on the windows icon on your screen. It does offer a box below to enter your wi-fi. Just ignore it and it will set itself up when windows loads.
Final point when running windows with your keyboard. you may find that the "@" doesnt work. Just make sure that the language you chose at windows set up matches the keyboard language in your windows. To find that, just type "keyboard" in the bottom left corner search bar and navigate from there to confirm.
The only advice I can give, is to read the instructions, read them again until you are totally comfortable with what you are about to do. And Good luck!
If this is on the wrong section of the Forum, I am sure someone will move it to the appropriate place for me
Last edited: