
MINIX - Martin
Staff member
MINIX NEO J50C-4 BIOS Update Version 0.15
- Remove Internal UEFI:shell.
- Change BIOS SETUP
- Update PXE Options Control。
- Update CRB code to CRB43
- Update Microcode: M01706A1_00000032.PDB。
- Disable startup BEEP 'Chipset' > 'South Cluster Configuration' > 'BEEP'
BIOS Update Version 0.15 Download Link
https://files.theminixforum.com/shared/bios/J50C-4-BIOS-V0.15-20191220.zip
Installation Instructions
1. Prepare a USB stick, and format it into FAT32.
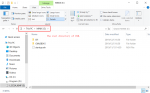
2. Download the BIOS files, and extract the downloaded zip files to the root directory of the USB memory stick. (See 1.Extract_BIOS_files_to_the_root_directory_of_USB.png)
3. Attach the following accessories to the NEO J50C-4:
- Power supply.
- A conventional wired keyboard.
- Prepared USB memory stick.
- A screen via the HDMI.
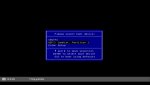
4. Power on the NEO J50C-4 by pressing the power button, and press "F11" key multiple times until the boot menu windows pops up. (See 2. Boot_from_USB.jpg)
5. Choose the USB option and "Enter", then you'll see 3.jpg. The UEFI will go to "GML0B015" folder of your USB automatically.
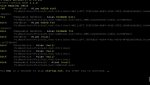
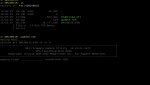
6. Type "ls" or "dir" command to make sure the BIOS files are there, which are "GML0B015.BIN" and "AfuEfix64.efi". (See 4.See_if_BIOS_files_are_present.jpg)
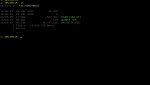
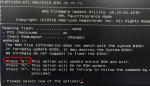
7. Run the "update.nsh" file to update the BIOS. (See 5.Update_BIOS.jpg)
Warning: Do not unplug the power supply when flashing the BIOS. Must not unplug until the BIOS flashing process has been completed.
8. When it wants you to choose one option, please choose "E". (See 6.Choose_'E'_to_proceed.png)
9. When the BIOS is updated successfully, it will automatically restart the Windows 10 OS.
10. Remove the USB stick. Everything is now finished.
When you go to the BIOS again, you can see the "Project Version" is now "GML0B 0.15 x64".
IMPORTANT WARNING: After upgrading the BIOS to 0.15, please DO NOT downgrade the BIOS to a lower version. Otherwise, the BIOS chip will be broken down.
- Remove Internal UEFI:shell.
- Change BIOS SETUP
- Update PXE Options Control。
- Update CRB code to CRB43
- Update Microcode: M01706A1_00000032.PDB。
- Disable startup BEEP 'Chipset' > 'South Cluster Configuration' > 'BEEP'
BIOS Update Version 0.15 Download Link
https://files.theminixforum.com/shared/bios/J50C-4-BIOS-V0.15-20191220.zip
Installation Instructions
1. Prepare a USB stick, and format it into FAT32.
2. Download the BIOS files, and extract the downloaded zip files to the root directory of the USB memory stick. (See 1.Extract_BIOS_files_to_the_root_directory_of_USB.png)
3. Attach the following accessories to the NEO J50C-4:
- Power supply.
- A conventional wired keyboard.
- Prepared USB memory stick.
- A screen via the HDMI.
4. Power on the NEO J50C-4 by pressing the power button, and press "F11" key multiple times until the boot menu windows pops up. (See 2. Boot_from_USB.jpg)
5. Choose the USB option and "Enter", then you'll see 3.jpg. The UEFI will go to "GML0B015" folder of your USB automatically.
6. Type "ls" or "dir" command to make sure the BIOS files are there, which are "GML0B015.BIN" and "AfuEfix64.efi". (See 4.See_if_BIOS_files_are_present.jpg)
7. Run the "update.nsh" file to update the BIOS. (See 5.Update_BIOS.jpg)
Warning: Do not unplug the power supply when flashing the BIOS. Must not unplug until the BIOS flashing process has been completed.
8. When it wants you to choose one option, please choose "E". (See 6.Choose_'E'_to_proceed.png)
9. When the BIOS is updated successfully, it will automatically restart the Windows 10 OS.
10. Remove the USB stick. Everything is now finished.
When you go to the BIOS again, you can see the "Project Version" is now "GML0B 0.15 x64".
IMPORTANT WARNING: After upgrading the BIOS to 0.15, please DO NOT downgrade the BIOS to a lower version. Otherwise, the BIOS chip will be broken down.
")