MINIX - Martin
Previous MINIX Staff
This is what you need:
# Windows-based PC (minimum Windows 7).
# An USB Stick with 8GB memory or more.
# Firmware (Download firmware here).
# A tool for writing firmware to the USB (Download tool here).
Please note, when you write the firmware to the USB stick, the USB stick will be formatted and be divided into two parts(About 1GB is active, the rest memory is unallocated). See the following picture

So, before writing the firmware to the USB stick, please do backup the data in the USB stick.
Instructions:
1. Extract the compressed firmware file(*.zip), you can find a file with a .zip extension and another one with the .img extension.
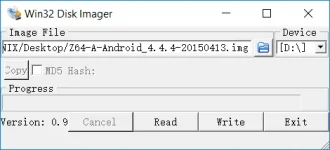
2. Extract the "Z64-A-Burning_Tool-Win32_Disk_Imager.zip", and run the tool on Windows-based PC by double-clicking "Win32DiskImager.exe".
The user interface of this tool should be like Win32DiskImager.png
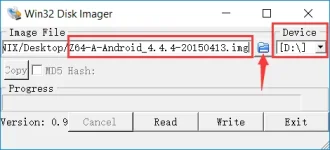
3. Insert the USB stick to the Windows-based PC, and load the firmware. (See attached picture Prepare_to_write.png)
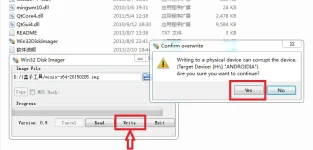
4. Click "Write" to write the firmware to the USB stick. (See attached picture Write_firmware_to_USB_Stick.png)
5. When finished the above procedure, plug-out the USB stick from the Windows-based PC, and plug it into the NEO Z64 unit.
Attach a conventional wired keyboard to the NEO Z64.
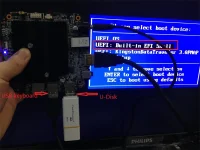
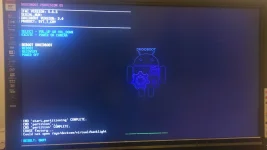
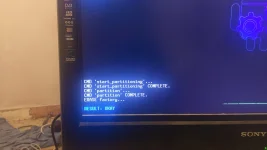
6. Attach the power adapter for the NEO Z64, power on the NEO Z64 by pressing the power button for 1-2 seconds, and press F11 key on the keyboard, and choose "UEFI: Built-in EFI Shell" option to start.
(See attached picture Start_From_Built-in EFI Shell.png)
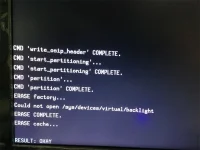
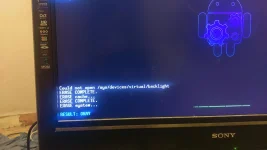
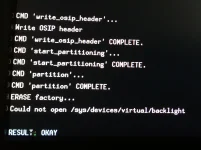
7. You don't need to do anything, just wait around 10 minutes before it finished. (See attached picture Installing.png)
The NEO Z64 will restart when firmware installation finished.
8. You may recover your USB stick by using Disk Genius or Easy recovery, or you may go to "Disk management" in the Windows OS.
# Windows-based PC (minimum Windows 7).
# An USB Stick with 8GB memory or more.
# Firmware (Download firmware here).
# A tool for writing firmware to the USB (Download tool here).
Please note, when you write the firmware to the USB stick, the USB stick will be formatted and be divided into two parts(About 1GB is active, the rest memory is unallocated). See the following picture
So, before writing the firmware to the USB stick, please do backup the data in the USB stick.
Instructions:
1. Extract the compressed firmware file(*.zip), you can find a file with a .zip extension and another one with the .img extension.
2. Extract the "Z64-A-Burning_Tool-Win32_Disk_Imager.zip", and run the tool on Windows-based PC by double-clicking "Win32DiskImager.exe".
The user interface of this tool should be like Win32DiskImager.png
3. Insert the USB stick to the Windows-based PC, and load the firmware. (See attached picture Prepare_to_write.png)
4. Click "Write" to write the firmware to the USB stick. (See attached picture Write_firmware_to_USB_Stick.png)
5. When finished the above procedure, plug-out the USB stick from the Windows-based PC, and plug it into the NEO Z64 unit.
Attach a conventional wired keyboard to the NEO Z64.
6. Attach the power adapter for the NEO Z64, power on the NEO Z64 by pressing the power button for 1-2 seconds, and press F11 key on the keyboard, and choose "UEFI: Built-in EFI Shell" option to start.
(See attached picture Start_From_Built-in EFI Shell.png)
7. You don't need to do anything, just wait around 10 minutes before it finished. (See attached picture Installing.png)
The NEO Z64 will restart when firmware installation finished.
8. You may recover your USB stick by using Disk Genius or Easy recovery, or you may go to "Disk management" in the Windows OS.